If you’re like me, the DVD drive in your unibody Macbook Pro (mid-2012 model or earlier) is just going to waste. With most software hosting going to the web and file sizes swelling, there’s reduced need for disc based media and increased need for fast, local storage.
In my own Macbook Pro, I replaced the original hard drive with a Samsung 850 Pro SSD (solid state drive) resulting in drastically improved performance, as well as a left over 500 GB Hitachi laptop drive. Although the drive’s performance wasn’t quite to my standards, especially for running OSX Yosemite, it would be great for slower access storage.
We need a way to get this extra hard drive into that unused SuperDrive slot.
Amazon and other online vendors sell a low-cost sleeve or tray that fits around the hard drive and adapts it to the SuperDrive slot. With the right tools and a steady hand, removing the old disc drive and replacing it with a new hard drive should only take about thirty minutes. For this demonstration, I’ll be using a Macbook Pro mid-2012 model – this was the last series released with a disc drive and without a Retina display.
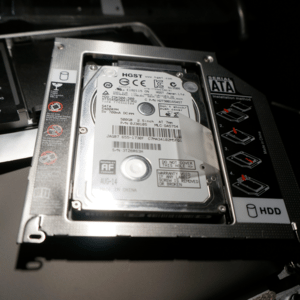
First, we need to procure the hard drive tray. For this tutorial, I’m using a well reviewed, inexpensive tray from Amazon. As you can see, the tray just adapts the hard drive’s SATA connector to the Macbook’s SuperDrive size, shape, and connection type.
The hard drive tray has four screws for each corner of the drive. Remove each screw, then gently place the hard drive inside the tray. Using a small tip Phillips head screw driver, replace each screw. If the drive is correctly lined up inside the tray, each screw will sink into a hole inside the drive. When done, the drive will feel securely fastened to the tray.

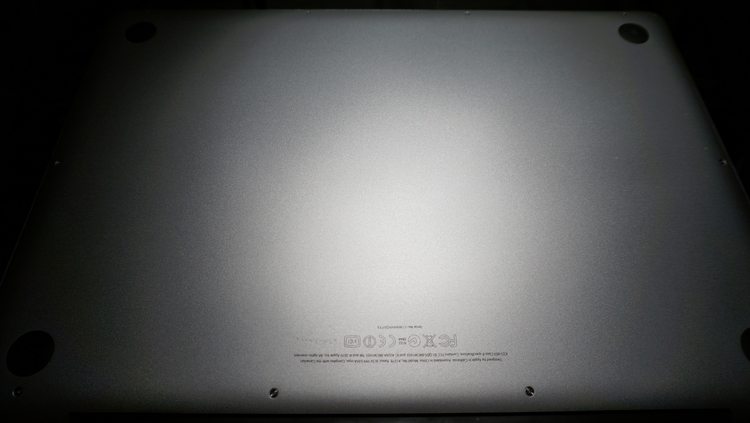
Next, we need to remove the bottom plate from our unibody Macbook Pro. The underside of a Macbook Pro uses ten tiny screws to fasten the aluminum plate to the chassis. Carefully remove each screw, and make sure not to apply too much pressure. Although the screws are well made, stripping one can make removal very difficult. Set the screws aside and make note of the three long screws; they’ll need to be replaced in the correct spots along the hinge once we put everything back together.
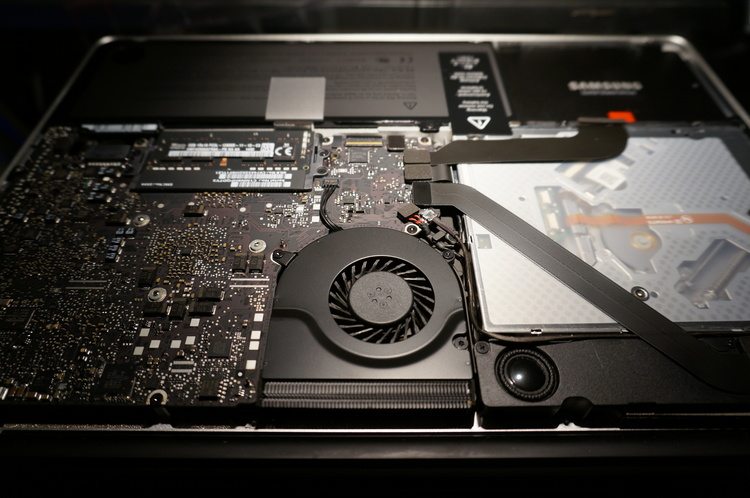
Now that we’ve got the bottom plate off, behold the inner beauty of your Macbook Pro. With the hinge pointed away from you, the SuperDrive should be to the right, just below the hard drive. You can see my juiced up Samsung 850 Pro in the top right corner and the SuperDrive just below it.
The SuperDrive is secured by a handful of small screws that are easy to damage. Make sure your screw driver is appropriately sized and has a well defined tip. I’ll be using a PH0 Phillips precision screwdriver for this.
Using your finger tips, gently remove the four attached cable heads and very carefully fold the top and bottom cable away. Do not bend or twist them. We just need to clear a little space to remove the Super Drive and expose the mounting screws.
With your precision screw driver, remove each of the screws shown. Four screws secure the SuperDrive to the case. Just below the SuperDrive are five more screws that hold the speaker and wifi adapter in place. Although we don’t need to remove either the speaker or the wifi, we need to loosen them in order to remove the SuperDrive beneath. Again, make sure to note the location of each screw; they’re of different lengths and must be put back in the right order to avoid damaging your Macbook Pro.


Once all screws are removed and the cables out of the way, you should be able to wiggle the SuperDrive out of its slot, sliding it out from underneath the speaker and wifi adapter. If you feel any resistance, go back and make sure all screws have been removed. Do not force anything.
If you inspect the SuperDrive, you’ll find one short cable attached, along with a mounting arm secured with two screws. Remove each and install them into the corresponding location on the hard drive tray.
Slide the prepared hard drive tray into the vacated space and line up the screws. Replace each mounting screw. Do not over tighten. Position the speaker and wifi adapter and replace those screws as well.
Line up each of the four cables and carefully plug them back in. Gently tuck the wifi adaper cable along the bottom edge of of the drive tray. Apply careful pressure to plug in each cable. They should snap into place easily.
Do a final inspection to make certain all screws are in place, that all cables are plugged in, and everything looks correct. If so, go ahead and replace the bottom plate, making sure to get those lengthy screws back into place along the hinge.
Power your Macbook Pro up and, using Finder, navigate to your new drive and bask in the glory of massive Macbook storage without paying Apple’s hefty asking price.
If you run into trouble or don’t want to risk damaging your Macbook Pro, be sure to call Poindexter for a free consultation and low-cost upgrade.