Ransomware is malware that hijacks your computer, encrypts or hides your personal files (photos, movies, music, school work, etc), and attempts to ransom that data for hundreds of dollars. It is among the most destructive and costly kinds of malware and steps must be taken by families and businesses to avoid it or, if already infected, contain it.
Although Avira lacks the embellishments of other, prettier antivirus programs, it more than makes up for the sparse interface by being the best free antivirus of 2015. In recent tests, Avira proved to be as effective as most paid for antivirus options, ranking alongside or better than service providers like Norton or McAfee Antivirus. Easy to install, Avira works great on its default settings and can be left to run automatically, protecting your computer without any performance loss or disruptions. Once a threat is found, Avira will notify you and, with your permission, will attempt to quarantine or delete the threat. With Avira’s ever expanding libraries and advanced holistic detection, your computer is in the best possible hands with Avira Free Antivirus.
When fixing computers in the field, Poindexter technicians know what works and what doesn’t – and Malwarebytes works every time. Although every computer needs a competent antivirus installed and running around the clock, no antivirus can protect your computer from every possible threat. Some programs, called PUPs or potentially unwanted programs, still manage to sneak paste even the best protection programs. This is where Malwarebytes truly shines. This free program will effectively remove intrusive malware, potentially unwanted programs, and countless other discrete dangers and annoyances. For Poindexter techs, Malwarebytes has been and will remain an essential part of our emergency tool kit.
Although Avira provides the best possible antivirus solution, many clients might benefit from a more comprehensive security solution with extra bells and whistles. For the best all around protection against phishing scams and fraudulent websites, Poindexter recommends AVG Protection. Once installed and configured, AVG will block your favorite internet browsers from loading known malicious websites, protect your computer from the most dangerous transmission vectors and causes of identity theft, as well as keep itself updated and run around the clock without system disruption. Stop internet threats at their sources with AVG’s internet protection.
As a general rule, never run multiple anti-virus programs simultaneously. Be sure to remove any other anti-virus you might have installed, including Avira, if you choose to use AVG instead.
Nearly all viruses, theft, and computer based intrusions are conducted through the internet. It makes sense, then, to have a well developed, feature rich, security centric browser. Although there are numerous browser options, ranging from the incredibly popular Firefox, to the less well known Opera, Poindexter recommends Google Chrome as our browser of choice. With its abundance of available security extensions, including Https Everywhere, regular updates, and easy syncing with Android devices, Google Chrome is the best compromise between features, protection, and usability.
Google Photo has become a convenient way to upload, caption, edit, and share photos and photo albums to friends and family. In this tutorial I hope to show you how to insert a Google Photo into Google Mail (Gmail) quickly and easily. By the end of this tutorial, you will know how to insert a Google Photo into an email and how to send it.
Check Google Photo
First, let’s confirm that the photos we want to send are available on Google Photo. Visit Google Photo to check.
Great! It looks like the photos I want are ready to be emailed to my friends and family. I have already edited and captioned them using Google Photo, so all that is left is to email them so everyone can enjoy.
Open Gmail
If we want to email anything at all, we’ll need to have Google Mail (Gmail) open in our internet browser. Visit Google Mail now. If you have recently logged into Gmail, your email inbox will immediately open, showing you your most recent received emails. If you haven’t logged in lately or ever, login now using your Gmail address and password.
Once Gmail has loaded, your screen will looking something like this. If so, great! Let’s proceed. Next, we want to Compose an email, so go ahead and click the Compose button.
Once you’ve clicked on the Compose button, a little window will popup in the bottom right corner. This is where we’ll be writing our email, as well as inserting our Google Photos or Google Albums (if we have any, that is).
In the example, I’ve already filled out the recipients and Subject box. If I were to click the blue Send button now, I would be sending only what you see in the email (my signature and logo) to [email protected] with the Subject “Here are some awesome photos!”
Let’s go ahead and get some of those awesome photos added into our email. Towards the bottom of the email window, you should see a tiny button that looks a bit like two stacked photos.
Go ahead and click that Insert Photo button. This will ask Gmail to load your Photos screen. The first thing it will show you are your Google Photos. Notice the Photos, Albums, Upload, and Web Address (URL) tabs at the top of this new window. Photos has a nice blue line underneath it indicating that it is the one shown. If we wanted to include an Album instead, we would select that. Let’s stay on Photos for now.
Just look at all of those great photos! I can’t wait to share them. Now, let’s select the photos we want to add by clicking each photo one time (left mouse button).
Clicking each photo you want to include will produce a blue checkmark in the corner, as well as highlight that photo with a blue frame. Once you’ve selected each of the photos you’d like to email, click the blue Insert button in the bottom left. If you decide not to email anything and just want to leave, go ahead and it the Cancel button next door.
Once we’ve Inserted our photos into our email, the photo window will vanish, and you’ll see your photos slowly appear inside of your little email window.
Depending on the speed of your internet connection, it might take a moment before your inserted photos are visible. Just sit tight until every photo you want to send show up in your email. Once every photo is accounted for, the last step is to hit the blue Send button in the bottom right corner of your email window. Once your email has sent, your Compose window will close and a notification will appear letting you know everything went alright. Thanks to the magic of the internet, your addressees will begin receiving your photo filled email in no time. Once it arrives, it will look very similar to this.
As you can see, all of my images arrived safe and sound. Inserting images into an email is a great way to send a handful of photos to friends and family. And, because it is sending them a copy of the photo, your recipients can edit, caption, and share those photos as they please without restriction. They can download the photo, magnify it, or post it to Facebook no problem! They can even Insert that photo into an email of their own and send it to whomever they wish. Excellent!
Hopefully this tutorial helped you better understand the basics of sending Google Photos using Google Mail. If you have any questions, concerns, or need personal tutoring or consultation, contact Poindexter today!
If you’re a Windows user, doubtless you’ve encountered the annoying and sometimes fatal Blue Screen of Death (BSOD), forcing your computer to restart, possibly costing you hours of unsaved work.
BSOD is an error screen in Microsoft Windows that shows an obscure, coded error, creates a debug file, then restarts the computer. On occasion, the issue is a minor glitch resulting from corrupted software and a reboot is all that is necessary to resolve the problem or happens infrequently and unpredictably. Other times, the error recurs, sometimes immediately after the computer boots, trapping it in a cycle of booting, BSOD, rebooting, repeat. This nasty problem is a fatal BSOD because it’s doesn’t permit any simple troubleshooting. If your computer is doing this or something like it, call Poindexter immediately for a timely computer repair or data recovery.
This short guide is intended for non-fatal BSOD crashes. If your computer is powering up, loading Windows, then crashing sometime later, this guide is for you. If your computer doesn’t load Windows correctly or won’t permit you to install any software, call Poindexter. If your computer boots successfully, then gets cranky sometime later, try these three tricks for a quick and easy resolution.
Uninstall Unnecessary Software
If your BSOD has only started recently, it’s possible that a newly added program is the culprit. Malware can frequently disrupt your computer in this way, as well as countless other programs that change Windows’ behavior or introduce new files that might make your computer dizzy.
If a program is responsible for your BSOD woes, removing it might remedy your problem in one handsome step. By accessing the Control Panel you can uninstall most programs. How to access the Control Panel varies a bit depending on which version of Windows you have, so we’re going to take a shortcut that works identically on all versions of Windows (Windows 98, XP, etc).
With your keyboard, press the Windows key (one on either side of the space bar) and at the same time press the ‘R’ key. This will open up the Run window, allowing us to tell Windows exactly what program we want to load without going through any messy menus.
In the Run window, type appwiz.cpl and press Enter. This will load the Uninstall Programs wizard, permitting you to safely remove programs you no longer need, recently added, or find suspicious. Leave programs you frequently use alone and look specifically for programs that you don’t recognize, but installed recently. One of these might be the culprit, especially if it is malware. If you’re unsure of what programs are good or not, contact Poindexter for easy computer repair.
Update Windows
Once we’ve removed unnecessary programs, it’s a wise precaution to make sure that Windows Updates have been applied correctly. Unless told otherwise, Windows XP and later will apply its own updates and reboot as needed. Occasionally, though, it will encounter an error or won’t apply optional updates that can resolve computer headaches.
Using the same Run windows (Press Windows key + ‘R’), type in wuapp and press Enter. This will open the Windows Update control panel. Go ahead and check for updates. If updates are found, make sure they’re all selected. Make sure, too, that all Optional updates are selected. At your command, Windows will install updated drivers as well as other inessential, but still valuable programs. Outdated or corrupt drivers can cause a BSOD and this is a simple way of getting all of your critical software running smoothly.
Reboot as needed. If there where many updates pending, prepare for a lengthy boot time. Grab some coffee, be patient, and wait for Windows to finish installing its updates. Rebooting before it has finished its work can cause additional system corruption and make your BSOD problems even nastier.
Run CCleaner
Last, we’ll be using a powerful, but simple tool to safely clean up your Windows PC, CCleaner. Visit CCleaner’s official website, download, and install the free version. Once installed, it will run automatically after you hit “Finish.”
Ccleaner includes two valuable tools that can help us clean up ailing Windows computers. Selected automatically after you load is the Cleaner tool. Go ahead and click the “Analyze” button, then the “Run Cleaner” button once it has completed its scan. This will clear your browser and system caches (hidden areas where Windows hordes temporary files).
Now, select the “Registry” button on the left. The Registry is where Windows saves much of its essential configuration details. Corruption in the registry can result in unpredictable system behavior, instability, and crashes. Ccleaner can safely backup the registry, as well as clean out junk entries.
Click “Scan for Issues”, wait for the scan to complete, then click “Fix Selected Issues…” When asked to backup changes, select “Yes”, then click “Save” in the Windows that comes up. Now click “Fix All Selected Issues” then “Close” once the repair work has completed.
Hopefully these three steps have resolved your non-fatal BSOD. If after trying the above your Windows PC is still crashing, call Poindexter immediately for emergency computer repair or data recovery services.
Poindexter is Baltimore’s best computer repair service, providing services to residents and businesses throughout the Hampden area. If your computer is crashing or needs professional repairs, call Poindexter for a free consultation and inexpensive solution.
Warning! There’s a phishing scam under way that is targeting Baltimore businesses and residents. If you think you’re a victim of this or any other internet scam, contact Poindexter immediately for computer repair, account recovery options, and next steps.
“Phishing is the attempt to acquire sensitive information such as usernames, passwords, and credit card details (and sometimes, indirectly, money), often for malicious reasons, by masquerading as a trustworthy entity in an electronic communication.[1][2] The word is a neologism created as a homophone of fishing due to the similarity of using fake bait in an attempt to catch a victim. Communications purporting to be from popular social web sites, auction sites, banks, online payment processors or IT administrators are commonly used to lure unsuspecting victims.”
— Wikipedia
This particular scam arrives as an email, purporting to be from Google. The email includes subjects like “Warning,you are required to go through the process,” “Delivery Status Notification (Failure)!!!,” or “Your account might be disabled, fix error.” The body of the email might contain are warning about your email account, recommending that you visit a link to change your port settings and retrieve your missed messages. We received three such emails in two days and have been contacted by two clients asking whether or not to respond to them. The email we received is provided below, but without the offending links.
Please delete and Ignore if this is not your email address
Clicking any of the provided links will direct your internet browser to a fraudulent page designed to look like Google’s account setting page. It will prompt you to enter your username and password; the site then sends those details to whoever is responsible for the scam, compromising your account.
If you receive an email like this or with an attachment claiming to be from Google or any other account provider, delete immediately. Do not click any of the included links. If you did follow through and enter your email and password on the phishing page, change your Google account password immediately.
Google, Bing, Microsoft, and every other major webmail provider will never ask you to change your port settings. They will never threaten to close your account in this way. And they will never ever include sensitive account details or service requests as an attached PDF file. Unusual stuff like this is a warning sign that the email isn’t genuine and might be a scam or worse.
Okay Baltimore, let’s talk about your slow computer and how to repair it. It’s something we all struggle with from time to time and it’s nothing to be ashamed of and it’s nothing you did wrong – slow computers happen to everyone. Thankfully, sluggish computer performance is totally fixable, even if the underlying problem is pretty complex. Never forget, you can always call Poindexter if things get hairy. We offer inexpensive computer tune ups for both PC and MAC and love a challenge.
Here are the top three things that can slow down your computer and simple ways to fix them.
Way too many programs are running
By far the most common problem we find on slow computers is the sheer number of programs running simultaneously. It’s normal for a computer user to add and install all sorts of neato programs, but if those programs run too often and aren’t closed properly, they’ll take a chunk out of your performance. Like people, computers have limited attention spans and the more things they have to keep track of, the slower they crawl. Programs aren’t an easy feat and each one requires some amount of brain power (the processor) and memory (the RAM). If there are too many programs running, the processor and RAM can get overloaded, bringing the whole computer to a crawl.
Not all programs tell you they’re running and finding the hidden ones can be tricky, but there’s a good, quick step to try first. In the lower right hand corner of your Windows PC, to the left of the clock, you’ll see a series of little icons. Each icon represents a program running (you might have to click the little arrow to see all of them). Look over each program and decide whether or not it’s worth having. If not, uninstall it or go into its settings and stop it from starting with Windows. If you absolutely must have each program or utility, consider investing in more RAM to free up some working space for your computer.
You Have a Virus or Malware
Viruses and malware are programs that run on your computer and, like any program, malware can gobble up resources. Some malware disguises itself as anti-virus or optimization software. We call these “potentially unwanted programs” and they should be uninstalled immediately. Software promising to update drivers, offer free backups, push you to buy something, or warn your of impending computer doom are almost certainly yuck malware and need to be kicked to the curb. If uninstalling them doesn’t work, consider calling Poindexter for a thorough cleaning. Beware that not all programs announce themselves to Windows and might be running in the background, hidden from view but still using up precious brain power. Some malware is front and center, leaving little doubt that they’re causing problems. Not all malware plays nice and let’s you uninstall it – in fact, some will reinstall themselves and their buddies immediately after you reboot. This can be very frustrating. But take heart! Poindexter can repair your computer.
Malware run amok can eat up memory, disk space, brain power, and make unauthorized changes to Windows and other programs, causing nastier problems than just slow performance. Crashing, weird errors, and other strange behavior all result from untreated infections and need to be dealt with quickly and completely. Uninstalling unwanted programs can free up lots of computer resources, improving stability, boot time, and system speed.
Your Hard Drive Needs a Tune-Up
A hard drive is the permanent storage of your computer; it’s where all files, images, music, movies… everything, gets stored. If you open up a hard drive, you’ll find a polished metal disc and a reading arm, sort of like a phonograph, but way more sensitive. Your data gets saved to this disc as a series of magnetic ones and zeroes. As the disc spins, the reading arm is able to read that code and send it to the processor which puts it all together as that adorable cat picture you saved four years ago and forgot about.
If your hard drive is running low on storage space, Windows can get claustrophobic. Windows loves having lots of elbow room to work – to do its job, Windows needs to make files, unpack stuff, and move stuff around. If there’s too breathing room, Windows can slow down severely or even crash.
Every file on your hard drive gets moved around as new stuff gets added and removed. With regular use, the contents of your hard drive can get disorganized, leaving stuff scattered around, forcing the hard drive and processor to work harder to put everything together correctly. We call this fragmentation and, naturally, defragmenting your hard drive every now and again can improve boot time and performance.
To defragment your computer’s hard drive, just search for defrag using your Start Menu’s search bar. The program “Defragment and Optimize Drives” or something like it will pop up. Select that and follow the instructions as they come up. If you haven’t defragmented in a long time (a year or longer), settle in for a long haul. This might take awhile.
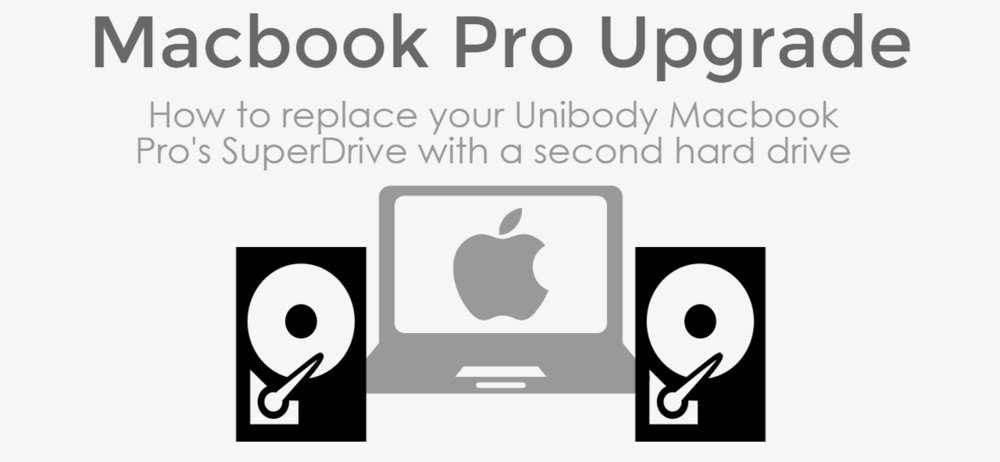
If you’re like me, the DVD drive in your unibody Macbook Pro (mid-2012 model or earlier) is just going to waste. With most software hosting going to the web and file sizes swelling, there’s reduced need for disc based media and increased need for fast, local storage.
In my own Macbook Pro, I replaced the original hard drive with a Samsung 850 Pro SSD (solid state drive) resulting in drastically improved performance, as well as a left over 500 GB Hitachi laptop drive. Although the drive’s performance wasn’t quite to my standards, especially for running OSX Yosemite, it would be great for slower access storage.
We need a way to get this extra hard drive into that unused SuperDrive slot.
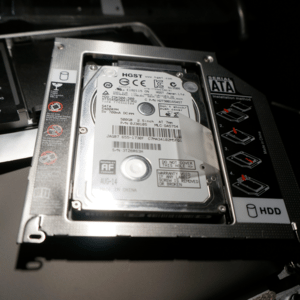
Amazon and other online vendors sell a low-cost sleeve or tray that fits around the hard drive and adapts it to the SuperDrive slot. With the right tools and a steady hand, removing the old disc drive and replacing it with a new hard drive should only take about thirty minutes. For this demonstration, I’ll be using a Macbook Pro mid-2012 model – this was the last series released with a disc drive and without a Retina display.
First, we need to procure the hard drive tray. For this tutorial, I’m using a well reviewed, inexpensive tray from Amazon. As you can see, the tray just adapts the hard drive’s SATA connector to the Macbook’s SuperDrive size, shape, and connection type.
The hard drive tray has four screws for each corner of the drive. Remove each screw, then gently place the hard drive inside the tray. Using a small tip Phillips head screw driver, replace each screw. If the drive is correctly lined up inside the tray, each screw will sink into a hole inside the drive. When done, the drive will feel securely fastened to the tray.
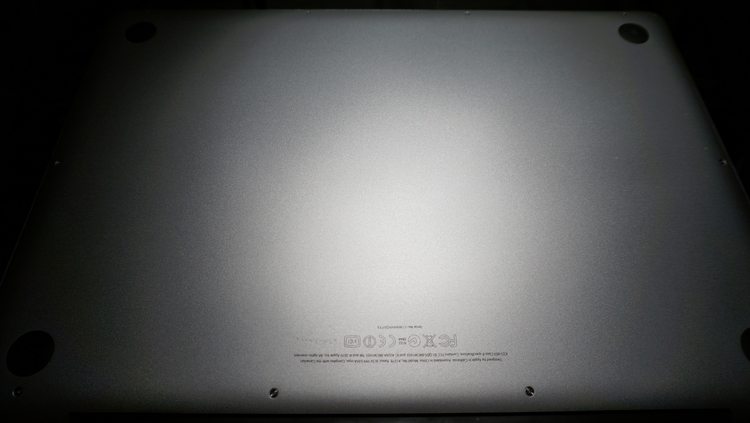
Next, we need to remove the bottom plate from our unibody Macbook Pro. The underside of a Macbook Pro uses ten tiny screws to fasten the aluminum plate to the chassis. Carefully remove each screw, and make sure not to apply too much pressure. Although the screws are well made, stripping one can make removal very difficult. Set the screws aside and make note of the three long screws; they’ll need to be replaced in the correct spots along the hinge once we put everything back together.
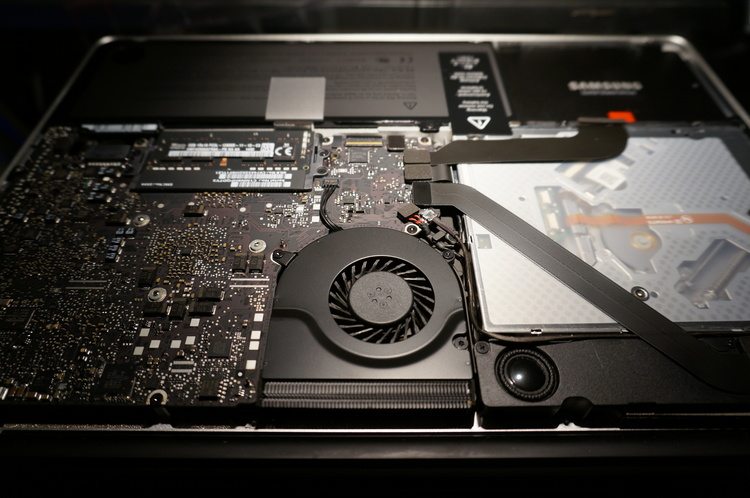
Now that we’ve got the bottom plate off, behold the inner beauty of your Macbook Pro. With the hinge pointed away from you, the SuperDrive should be to the right, just below the hard drive. You can see my juiced up Samsung 850 Pro in the top right corner and the SuperDrive just below it.
The SuperDrive is secured by a handful of small screws that are easy to damage. Make sure your screw driver is appropriately sized and has a well defined tip. I’ll be using a PH0 Phillips precision screwdriver for this.
Using your finger tips, gently remove the four attached cable heads and very carefully fold the top and bottom cable away. Do not bend or twist them. We just need to clear a little space to remove the Super Drive and expose the mounting screws.
With your precision screw driver, remove each of the screws shown. Four screws secure the SuperDrive to the case. Just below the SuperDrive are five more screws that hold the speaker and wifi adapter in place. Although we don’t need to remove either the speaker or the wifi, we need to loosen them in order to remove the SuperDrive beneath. Again, make sure to note the location of each screw; they’re of different lengths and must be put back in the right order to avoid damaging your Macbook Pro.
Once all screws are removed and the cables out of the way, you should be able to wiggle the SuperDrive out of its slot, sliding it out from underneath the speaker and wifi adapter. If you feel any resistance, go back and make sure all screws have been removed. Do not force anything.
If you inspect the SuperDrive, you’ll find one short cable attached, along with a mounting arm secured with two screws. Remove each and install them into the corresponding location on the hard drive tray.
Slide the prepared hard drive tray into the vacated space and line up the screws. Replace each mounting screw. Do not over tighten. Position the speaker and wifi adapter and replace those screws as well.
Line up each of the four cables and carefully plug them back in. Gently tuck the wifi adaper cable along the bottom edge of of the drive tray. Apply careful pressure to plug in each cable. They should snap into place easily.
Do a final inspection to make certain all screws are in place, that all cables are plugged in, and everything looks correct. If so, go ahead and replace the bottom plate, making sure to get those lengthy screws back into place along the hinge.
Power your Macbook Pro up and, using Finder, navigate to your new drive and bask in the glory of massive Macbook storage without paying Apple’s hefty asking price.
If you run into trouble or don’t want to risk damaging your Macbook Pro, be sure to call Poindexter for a free consultation and low-cost upgrade.
I worked with Geek Squad for two years, but left to launch Poindexter. While working for them, I made some close friends, learned some neat tricks, and was able to play with expensive tech that I couldn’t possibly afford on a meager Geek Squad salary (the Best Buy discount isn’t that great, guys). Geek Squad’s prices and how they treat clients and employees is what makes small, locally supported efforts like Poindexter necessary.
Here I discuss my experience working for Geek Squad, how Poindexter strives to be different, and how we hope to return to the bygone days of personalized tech support, like Geek Squad used to; Geek Squad is more machine now than man.
Let’s lay some ground rules first. I won’t break their air tight confidentiality agreement. Like Apple’s App Store agreement, I didn’t read it, nor did I happen to have a brawny lawyer on hand to summarize it for me. Anything I say here is either common knowledge or on the tip of the tongue, just waiting to be said. It’s just stuff we already know about Geek Squad but seem afraid to talk about.
So. Why not Geek Squad. Full stop.
“Automation and simplicity is the key to reducing staff and saving money, and what Geek Squad can’t automate, they outsource. ”
Quantity Over Quality
When Geek Squad was smaller scale, they served fewer clients in a smaller coverage area. Their service and staff were refreshingly personal, and Geek Squad built its client base organically with a bicycle, a few bucks, and an ambitious pioneer who realized that computer geeks shouldn’t smell bad or be condescending jerks. Geek Squad brought folks computer relief in a tie-dee (pun!), Beatle driving package. Strong values and a simple idea executed well. It was tech support with heart.
Today, Geek Squad is a Best Buy owned mega-corp that prioritizes profits and cost savings to satisfy finicky, money minded share holders. This pressure is forcing Geek Squad to change, and not for the better.
The big American businesses are expected to grow constantly, always turning a profit, always increasing in value. This is tough for service based companies that don’t scale well, like Geek Squad or Poindexter. A company that scales well is one that can continuously increase profit as sales volume increases. Imagine a musician selling a hot track on iTunes. The more music they sell, the more money they earn. There’s no end to the amount they can make and it doesn’t cost more to distribute their music digitally.
In contrast, service companies need actual meat and bone people to do the essential work, and more meat and bone people to manage them. Geek Squad needs butts in those seats to doll out high-tech wizardry, day in and day out. Each of those butts needs a paycheck, training, and to be monitored and encouraged. It’s expensive, especially if you want to hire Americans, who expect luxuries like maternity leave, health care, or a (gasp!) living wage. Sure, industrial psychologists can make those watery humans more efficient and drive productivity with better automated programs, but they can’t wholly eliminate the need for inefficient, expensive human beings. The more people you have, the more you need, until the meat mountain collapses under its own weight.
To earn that tasty profit and keep shareholders confident, Geek Squad needfully slings tech support like fast-food cheeseburgers, using the fewest, low-cost workers possible. The beating heart of Geek Squad is still comprised of capable, well paid technicians, responsible for crafting the tools and software that store technicians use daily. They’re the human center to Geek Squad’s button pushers, and are responsible for making Geek Squad agents more efficient, without making them entirely ineffective. These high tech tools lower the bar for Geek Squad staff, letting potentially anyone “troubleshoot” problems. Click the button, set some variables, and let the robots tear at it. In a few hours, most of the work will be done, all without pesky humans there to think through anything. Naturally, automation and simplicity is the key to reducing staff and saving money, but what Geek Squad can’t automate, they outsource. More on that shortly.
“Lured by the prospect of work, youngsters, seasonal college students, and desperate computer enthusiasts volunteer to serve Geek Squad. Sure, the job might seem more glamorous than Burger King, but the takeaway pay is the same (sometimes lower).”
They Don’t Pay Well.
The Geek Squad staff you’re likely to find working the stores come in three basic types. They might be low level techs who depend entirely on automated software, aspiring technicians desperate to make ends meet, or disgruntled techs who confuse cultural esoterica for an actual career. For some, Geek Squad is a way station, onward to something else – like Poindexter – where you actually get to do the work the job application promised, instead of watching a computer script clumsily do it instead. For others, it’s a quagmire of poverty and self-doubt that leaves them cynical, contemptuous, and trapped.
On average, freelance computer technicians charge $50-75 dollars per hour. To make ourselves available to low income communities, Poindexter charges one time, flat fees for most services, or a low hourly rate of $20.00. As a small business, every cent Poindexter earns must be reinvested into its people. Tellingly, Geek Squad agents earn an average of $12.00, though many receive less. Like clockwork, Geek Squad employees will cite Best Buy’s discount and the company’s culture as perks, but perks don’t fill the financial vacuum. That’s simply not a livable wage, particularly if you have children, a mortgage, or student loan debt. Sure, the cutesy weirdness of Geek Squad culture can make you feel like part of the in-crowd, member of an elite technocratic cult, but company culture doesn’t pay the bills.
Lured by the prospect of work, youngsters, seasonal college students, and desperate computer enthusiasts volunteer to serve Geek Squad. At first the job will seem more glamorous than Burger King, but the takeaway pay is the same (sometimes lower). In my experience, employees who aren’t paid well grow careless, resentful, and dismissive, especially since they don’t have the dispensary income to safely quit. So staff get sullen and disengage from their work. This creates a poisonous workspace and no amount of cultural currency can counteract it.
Geek Squad staff are only rewarded for selling services, discouraging counter agents from doing actual tech support or working too hard to keep up appearances. Good tech help takes time and Geek Squad staff keep their consultations brief, leaving plenty of time for the sales pitch and just enough time to assess the client’s original problem. Poindexter, in contrast, includes a minimum of one hour for each consultation. Sure, we make less money, but we’re able to do a better job and ensure client satisfaction. Supporting people, including our own staff, is the cornerstone of every business, but Geek Squad seems to have forgotten that dogma somewhere on the path to greater wealth. Unhappy workers might mutiny and go on to found a new, better company.
“This is why Poindexter does all computer work from our lab in Hampden, Baltimore, and only trusted, local technicians are employed. People you know – people who live nearby. Our tech support and computer repairs are given to Americans who deserve the work.”
They Outsource. A lot.
If you’ve ever surrendered to the Geek Squad call center labyrinth, you were first processed by their overseas call center, then connected with a foreign technician. Customers are so familiar with this, we don’t even question it. Sending jobs overseas is an all too common way for American businesses to cut costs by relying on cheap foreign labor. Geek Squad is no exception. Whether you call their support line or reach out to a local Best Buy, Geek Squad will use overseas labor wherever possible. Of course, some computer repairs require local workers, but this is expensive and time consuming. For Geek Squad to service an ever expanding customer base, all while avoiding the high expense of hiring local technicians, they have no choice but to trust in overseas labor farms. This creates immediate control problems, especially with client’s data privacy. The more hands involved in your computer’s repair, the greater the threat of data theft. Geek Squad is regularly criticized for playing fast and loose with client data. Whenever possible, never trust your computer to a stranger.
This is why Poindexter does all computer work from our lab in Hampden, Baltimore, and only trusted, local technicians are employed. People you know – people who live nearby – people who you’ll see at Wyman Park. Tech support and computer repair from good, local folks you can trust.
Geek Squad was designed to troubleshoot the problem of tech support itself. Unfortunately, the company’s shift in profit minded margins drove them down path of harmful compromises. Their customers are understandably frustrated, employees are unhappy, and service quality and safety has degraded severely. Supporting Geek Squad means paying into questionable business ethics, and a tacit acceptance of the profit obsessed policies that hurt consumers, service providers, and the economy overall.
Poindexter is a return to the local. A return to people oriented help. A return to the help you deserve.
Adware, also called ad injection sofware, is among the most common infection type you’ll encounter on the internet. Once installed, adware will modify your internet browser (Internet Explorer, Firefox, Chrome, etc) and computer’s security settings, so it can shove more advertising into websites, create advertising popups, or replace good ads on sites you trust with junk ads.
Adware is a huge money maker for rogue developers. Each infected computer earns them more ad revenue, so the goal is to spread adware to as many computers as possible. In fact, the incentive is so strong, adware developers commonly partner up with websites and computer manufacturers, like Lenovo, to include adware in their products. Consider CNET, a popular download hub and technology review site. Scattered throughout CNET are ads promoting other software products. Some of those ads are disguised as parts of the website and might appear as “Download Now” buttons, intended to confuse the visitor into clicking. Once you click, it’s too late. Adware, and it’s information gathering counterpart spyware, can download and install very rapidly, sometimes invisibly, and compromise your system without your awareness.
Spyware doesn’t promote a product, needn’t install like a normal program, and might be entirely invisible to most users. Once infected, spyware quietly sits in your computer’s memory and collects personal information about you and your family. Most spyware will monitor your web browsing habits and send that information to adware networks. Nastier spyware can harvest passwords, contact lists, phone numbers, and credit card information.
Common Adware and Spyware
Spyware and adware are commonly packaged together. If you have adware, you almost certainly are infected with spyware as well. Once installed, the adware will promote other products – some legitimate, some less so – every one of them irritating to users. Adware creates a cycle of infection that can be hard to break out of. Many of the ads are malicious and will harm your computer further if clicked. Some ads, for instance, might warn you of an infection or necessary update. Clicking these ads will take the user down a rabbit whole of alarmist claims and sleezy software. Poindexter recommends never downloading software that promises to fix any problem on your computer. Software which promises to optimize of update your Windows or Apple computer at best does nothing, at worst is just another source of infection.
Adware is also responsible for frequent tech support scams. They trick the user by promoting “free security scans”, which, when completed, warn of impending dangers from viruses, outdated drivers, or other mysterious sounding computer stuff. This is followed up with a push to buy overpriced software to fix the fake problem. You might even receive a call from a “certified tech something something”, who will try to convince you to purchase costly tech support. Their scare tactics are effective and cost American households hundreds of dollars in damage.
These problems are extremely common. In our experience, adware infections can come on gradually – an extra ad here or there – but the infection worsens and, eventually, the computer becomes entirely unusable. The computer might lose the ability to show websites or lose its internet connection all together. It might behave sluggishly or fail to start correctly. If you suspect your computer is infected with adware or spyware, call Poindexter (908-991-NERD) today for a low-cost cleaning and repair. Don’t leave your personal details in the wrong hands.
We’ve heard this scenario time and again, from students, nurses, and lawyers alike: “I woke up, powered on my Macbook (or whatever), left to grab a cup of coffee, and came back to this. What even is this? I rebooted and rebooted, and nothing changed. Just this. This folder with a question mark”.
If you’re a long-time Apple Macbook user and never suffered this frustrating and confusing boot error, consider yourself lucky. Apple minimalism run amok, this error can occur shortly after you power on a Macbook or iMac computer, and says so very little about what the problem could be.
This doozy of any error generically means that your operating system, OSX – the software responsible for making your computer do all the computer things – can’t be found by the firmware. Firmware is like a mini-operating system, responsible for super basic things, like accepting electrical power, finding the hard drive, then figuring out where OSX is installed and getting that booted up. If the firmware can’t find OSX, it panics and produces this tortuously imprecise mystery screen.
Don’t panic. It’s fixable.
At its most basic, this error means the computer can’t find your operating system, OSX. This could be a few things:
There’s a mechanical problem with the hard drive and it needs to be replaced.
There’s a software problem with the hard drive and it needs to be repaired.
There’s a software problem with OSX and it needs to be repaired.
Is the hard drive okay?
To understand out what kind of problem we’ve got, let’s see if the computer can tell us if there’s a hard drive installed. If the computer can see that there is a hard drive, we’re in better shape. This step requires that we access the Macbook’s special recovery area.
This is the OSX recovery screen, necessary for trouble shooting the question mark mystery folder.
When you first power on the computer, but after you hear that happy chime sound, press and hold Command and the R-key. Keep holding both until you see either a world globe or the Apple logo. Eventually, you’ll arrive at the Recovery screen, with Utilities menu listed along the top most edge. Click that, then select Disk Utility.
Disk Utility will open up and show a list of available hard drives on the left side. Or, rather, we hope it does. If you don’t see your Startup disk (probably called Macintosh HD), there’s some kind of mechanical issue with your hard drive. It might have malfunctioned and needs to be replaced. Or, it slipped out of its cozy slot and needs to be reseated. It might also be a malfunctioning drive cable, which is pretty common and inexpensive to fix. Unfortunately, all of these problems require opening up the insides of your Macbook or iMac. If this sounds like too much, give Poindexter a call right away (908-991-NERD).
If you see a hard drive listed, you’re in luck. This usually means that the issue is software related. There could still be something funny going on under the hood, however, so don’t celebrate just yet. We need to repair the disk first.
Go ahead and select the disk from the left, then click on the First Aid tab towards the top. Near the bottom right, you’ll see two buttons: Verify Disk and Repair Disk. Click on Repair Disk and let your Apple computer crunch away for awhile. Depending on the severity of your problem, this can take a few hours. Sometimes, it’s done in less. And so we wait.
If Disk Utility finished successfully, restart you computer. With some luck, you’ll arrive at your login screen and everything will be normal. If it failed, well, it could still be a hardware problem or an even murkier software fault.
At this point, we recommend consulting with a pro about your Macbook or iMac, in case you need to backup your data and reinstall your operating system from scratch. It’s possible, too, that the hard drive will need to be replaced. Poindexter’s first priority is to backup your data to avoid any catastrophe.
Don’t risk your data. Call Poindexter for help.
If your device is outside of Apple’s warranty, Apple’s Genius Bar services will all be paid out of pocket, resulting in hundreds of dollars lost. Repairing out of warranty Apple products is crazy expensive, unless you bring it to Poindexter. We can fix your hard drive problem without breaking the bank. Promise.


 To understand out what kind of problem we’ve got, let’s see if the computer can tell us if there’s a hard drive installed. If the computer can see that there is a hard drive, we’re in better shape. This step requires that we access the Macbook’s special recovery area.